DirtRacks Heavy Duty Soft Luggage Rack 2021+
The T7 aftermarket luggage rack industry seems stuck in 2 basic racks designs. 1) for hard/soft luggage that places the bags wide, high & rearward, or 2) rackless designs that hug the rear body panels...both offer pros & cons depending on use. RideADV, a motorcycle tour company in Australia with a fleet of T7s, designed their own rack system dubbed the Solo Rack (meant for solo riding) that places the racks significantly closer to the center line of the bike, forward & lower than conventional racks + utilizes the passenger peg hanger mounts with the oem hangers removed. It is a sturdy well designed 3 point mount system minus the rear cross bar design, but pricey @ $525 au + $110 au shipping to Vancouver Canada.
RideADV Solo Rack
DirtRacks
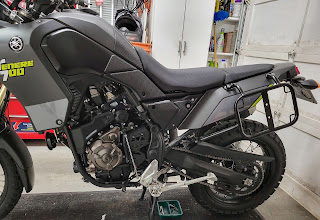
Enter DirtRacks, a Canadian company, that specializes in motorcycle racks, crash bars, etc. whose products offer good value, that is local for me in Langley, BC (Greater Vancouver area). I met with brothers Robert & Fred, who were receptive to developing a companion rack to their existing hard & soft luggage racks similar in design concept to the RideADV Solo Rack & this is the result of that collaboration. Robert graciously agreed to incorporate my design for the location of the bag strap tabs, which are welded externally & at the 2 bottom corners in their production rack....I wanted inboard welded tabs with 1/corner to accommodate vertical & horizontal bag orientation & be less susceptible to damage in a tip over or hitting me in a come off...making my racks a 1 off...thanks Robert 👍
This rack was designed to work with most soft luggage bags, not hard luggage (DirtRacks has another model w/rear crossbar better suited to heavier loads), made from 3/4 inch (19.05 mm) steel tubing & powder-coated. All mounting bolts/spacers included using the 4 oem luggage strap bung mounts on either side of the passenger seat & mounting to the rear oem peg hanger bolt location (hanger installed). The main hoop is about 12.5 x 9 inches & both racks weighs about 5 pounds total. A welded middle vertical bar pre-drilled to fit a Rotopax was incorporated on both racks.
Fitment Issues
2 fitment issues surfaced during install: the supplied spacers for the footpeg mount were not the correct length, being too long for mounting to the oem footpeg hanger or not long enough with them removed & the right forward mounting tab hole was misaligned slightly.
Other Observations
The mounting design utilizes a basic welded on perpendicular tab 3 vs 4 point system using long 45 mm, relatively small 16 mm o.d. diameter, 3 mm wall thickness steel spacers that produce inherent rack flex to side or torsional loading of the rack, such as during a fall or even when just grabbing the lower back corner by hand as might occur when lifting the bike upright after a fall...it is likely sufficient for the weight/loading of soft luggage but could cause rack failure and/or frame damage with enough unwanted loading...possible improvements:
- adding a 4th mount at the back, like DirtRack's hard bag rack;
- and/or incorporating an upper mount design that eliminates the welded on tab & shortens the bolt length ;
- and/or use of a shorter, larger diameter & thicker wall spacer;
- and/or relocate the front mount directly to the frame vs to the footpeg hanger;
- and/or reposition the right rack for improved clearance with the oem muffler at the back
The right rack center bar for RotoPax was not centered.
The use of non-industry standard 16-18 mm o.d. tubing restricts the use of some luggage accessory systems such as Giant Loop's Pannier Mounts for Soft Luggage Mounts (DR uses 3/4" or 19.05 mm o.d. tubing + powder coating).
Mounting Modifications Phase 1
Since I have removed the oem foot peg hangers it required longer spacers for the lower forward mounts, then fitted shorter (38 vs 45 mm) & larger diameter (23 vs 16 mm) thicker wall upper spacers which seem to increase resistance to flex because of the increased surface contact area. This moved the rack slightly closer to the centerline of the bike without contacting the body panels. The result looks to be ok with 10 mm clearance to the oem muffler at the back lower corner of the rack. Real world testing will have to wait until next spring when the bike is insured again. If the structure still requires additional strengthening it should not be too difficult to design a rear mount bar/support that bolts to the sub-frame under the wheel well where the tail tidy or oem rear fender assembly bolts to. I will source metal spacers to replace the pvc ones used in the pics. Note that DirtRack's utilizes a symmetrical design with even spacing/per side & both racks angled outward at the bottom...the right more so for adequate clearance of the oem muffler.


Mounting Modification Phase 2 w/OEM Muffler
To facilitate rack location closer to the centerline, increase strength/rigidity of the forward footpeg mount eliminating the need for a spacer & reposition the left rack more perpendicular vertically I cut off the left rack forward mounting tube then relocated & rewelded it to the hoop so that it now mounts directly to the rear oem foot peg mount without the need for a spacer. This resulted in a stiffer set up & is the preferred method of front attachment adopted by most other rack manufacturers, that DirtRack's should have utilized imho, which would have eliminated the long spacers & only need a short front spacer the same thickness as the rack mounting tab should the oem foot peg hangers wish to be retained. In order to obtain a more perpendicular vertical left rack position the 2 upper mount spacers (replaced the DR 16 mm o.d. diameter steel spacers & previously used 23 mm o.d. diameter pvc spacers with aluminum spacers) were angled inward on the outer surface that interfaces with the rack mounting tabs.

In order to improve heat clearance for the muffler & get enough clearance for the GL Pannier Mounts for Soft Luggage Racks lower mount locating screw the right rack requires new upper spacers slightly angled outward on the outer surface that interfaces with the rack mounting tabs, which allowed use of the DR original upper mount steel spacer for the forward footpeg mount. This will be a temporary mod until I sort out which high mount muffler set up I will go with & then hopefully be able to duplicate the left rack mount location/orientation. A option would be to implement a rear cross brace mount between the racks for increased stiffness.
Mounting Modification Phase 3 w/MIVV Dakar Exhaust (April 2023)
Installation of the
MIVV Dakar high mount exhaust allows for a similar modification to the right rack as was previously done to the left rack to relocate it further inward & more perpendicular to the ground by cutting off the front mounting tube & rewelding so that it mounts directly to the rear footpeg hanger mounting location without a spacer. The resulting total width of the racks from side to side is now 52 cm or 20.5", which is about the same as the total width of the
Dirt Racks Crash Bars. Clearance from the muffler to the outside of the rack is 6 cm or 2.375" which should provide adequate space to prevent heat transfer issues for soft luggage....I also use the
Giant Loop Quick Detach Pannier Mounts with my
GL MotoTrekk soft bags which add another 1 cm or 0.4" of air gap.


Comments
Post a Comment