Tenere 700: Skene Photon Blaster Turn Signals Front Visibility Light Kit with Skene IQ-250-TS Controller, Power Outlet Splitter Kit for Yamaha Tenere 700 10 Amp Accessory Connector
Skene Photon Blaster Turn Signals Front Visibility Light Kit with Skene IQ-250-TS Controller for Increased Conspicuity
I already have Cyclops's 3.0 Multifunction LED signals that provide bright amber sequential front turn signals + white running lights & amber rear sequential turn signals + flashing & sequential red brake light (implemented on my bike) or red running light function. Lights mounted under the headlight tend to blend in with it when viewed from a distance or the side, so I prefer a separate amber DRL mounted further away from the headlight for improved recognition & chose the very bright Skene Photon Blaster LED front visibility light Kit with their IQ-250-TS controller that adds turn signal capability to the running lights + their patented conspicuity flicker whereby the LED modules flicker at a high speed when viewed out of the corner of the eye (peripheral vision) but the flicker disappears when viewed directly at a distance (central vision). The high speed flicker rate has been designed to optimize visibility without being distracting or violating laws against flashing lights & can be turned off via programming. They are designed to be mounted vertically to the forks but can be adapted to other locations & orientation.
Photon Blasters DRL mounted on my Tenere 700
I mounted the Photon Blasters to my DirtRacks Crash Bar lower front cross support via 2.54 cm (1") rubber coated electrical clamps wired to the right side oem 10 amp switched accessory power via the harness splitter connector (see below). This provides a protected, sturdy, rubber isolated mounting location with enough separation from the headlight, turn signals & Stedi STK3 LED light bar mounted under the headlight to provide recognizable conspicuity + allows horizontal or vertical orientation, along with easy & safe routing of the wiring that did not require extending the harness. They are angled slightly outward & upward to provide maximum effect when viewed from other driver's vantage point. I considered mounting to the Barkbuster handguards, which would put them closer to eye level for most drivers, but was concerned that the close proximity to the turn signals would diminish the oem signal recognition.
Video Demonstrating Flicker Function
Video Demonstrating Turn Signal Function
The bright Skene Photon Blasters/IQ-250-TS controller with flicker & turn signal functions in combination with the Stedi STK3 LED light Bar/IQ-275X controller really improve conspicuity!
Skene Photon Blaster Turn Signals Front Visibility Light Kit with IQ-250-TS Controller
photo from Skene Website
Skene Photon Blaster Turn Signals Front Visibility Lights
- The latest version has been redesigned with enhanced LED modules & refracted lens providing 180 degree viewability
- Aluminum waterproof housing
- Oval 20 x 70 degree pattern
- Available in red, yellow & white LED modules
- Uses just 0.20 amps
- Up to 40 can be powered by a single Skene controller which offer flicker, alert & turn signal functions
Skene IQ-250-TS Controller
- The IQ-250-TS model adds turn signal capability to the running lights, with their patented flicker
- Flicker function only works when connected to LED bike turn signals, incandescent bulbs respond too slowly & can be turned off via programming
- This controller can be used to connect to your stock turn signals and convert them to marker lights
- The IQ-250-TS can control any number of lamps drawing up to 3 amps per channel (left and right)
- Controller current draw: 0.015A, plus lamp current
- Operating voltage: 9 - 16 VDC
- Control module dimensions: L: 1.75" W: 1.31" H: 0.5"
- Control module weight: 1 oz.
- Maximum Lamp Current: 6 amps, 3 amps per channel (left and right)
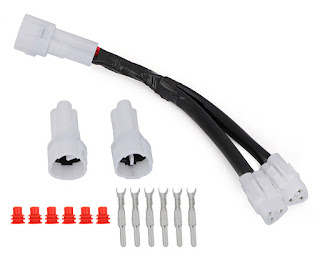
Power Outlet Splitter Kit for Yamaha Tenere 700 10 Amp 3 Wire Accessory Connector
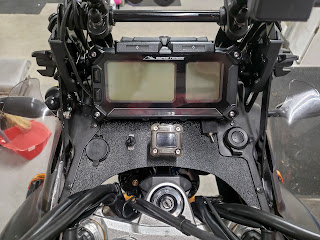
There are 2 each oem switched 3 wire (10 amp - 1 ground, 2 switched power) & oem switched 2 wire (2 amp - the left side is wired to the oem accessory outlet circuit) connectors for auxiliary lighting, heated grips or other electrical accessories located behind each of the Tenere 700 front body panels. Prewired power harnesses, splitters or individual connectors to match the 3 position oem Sumitomo .090 waterproof MT style connectors or the 2 position .090 unsealed MT connectors for 16 to 20 AWG sized wire can be sourced online from several retailers like Eastern Beaver, ebay & AliExpress. A splitter kit will allow for simplified connection & trouble shooting of the Skene Photon Blaster/IQ-250-TS controller & other accessories, using the Tenere 700 right side oem 10 amp switched accessory plug.
Wiring the Skene Photon Blaster LEDs/IQ-250-TS Controller & Power Outlet Splitter
The Skene IQ-250-TS requires the red wire (15 milliamp controller power) to be connected to switched fused power, so used the 2nd male splitter plug for the 3 wire 10 amp oem connector on the right side (the 1st splitter plug was used to connect the Stedi STK3 LED Light Bar & combined the Photon Blaster black wires with the IQ-250-TS black wire to the switched power black ground male plug pin & plugged the unused 2nd positive pin slot with the waterproof rubber plug taken from the oem blank plug. The yellow wire connects to the positive wire of the right turn signal & the green wire connects to the positive wire of the right turn signal via supplied posi-tap connectors. The gray/green wire connects to the left Photon Blaster LED & the gray/yellow wire connects to the right Photon Blaster LED. Shrink wrap tubing was added to protect the wires. The Skene controller was attached to the inside surface of the Tenere 700 right side resin frame near the fuel tank with the supplied stick-on velcro clear of interference with the forks.
Tech Tips:
- Layout your wiring harness & double check correct wiring configuration & connections pre-installation;
- It helps to have proper crimpers for connecting wires to the male plug pin connectors, but needle nose pliers work & confirm correct orientation of the pin when inserting into the plug housing to ensure it locks in place & properly insert the rubber seals where the wires insert into the male connector housing;
- Confirm that the plug harness or splitter purchased followed the same convention as the oem plug for location of ground & positive & that each wire has continuity;
- Use caution with routing wiring from the left side to the right or near the steering stem & forks to ensure no binding or chaffing, best practice is to follow existing wiring looms;
- Additional larger sized zip ties than the small ones provided may be needed.
- Use of dialectric grease for all plug connectors, posi-connectors & heat shrink tubing for all exposed wiring is recommended.


Comments
Post a Comment